Veggie MeltsThis appetizer is great for any summer get together or picnic. They are so good we end up eating them for the meal sometimes! We like to use the baguettes from Serious Delights Bakery as they are made with local ingredients
|

|
Ingredients:
Pre-heat oven to 425
Slice baguette in half inch slices and set aside. Slice zucchini in about quarter inch slices and set aside. Slice the tomato in thin slices and if they are large cut in half so they can fit on the bread slices without flopping over onto the pan.
In a small bowl place the 1 cup of mayonnaise and crush garlic into mayonnaise. Take basil and using scissors cut basil up in small pieces and add to mayonnaise mix. Using a fork stir mixture together until everything is mixed well.
Take mayonnaise mixture and spread a thin layer on each slice of bread and arrange bread on a cooking sheet, stone ware types work best as it keeps the bread from getting too soggy on the bottom. take zucchini slices and add one slice on top of each bread slice then place tomato slice on the top of the pile. Slice the mozzarella in thin slices and place on top of the veggies. Place pan of veggie melts in pre-heated oven and bake for 10 to 12 minutes or until the cheese has melted and started to brown. Remove from oven and let cool a few minutes before serving. Can be eaten while hot or when cool.
- 1 baguette
- 1 to 2 medium size zucchini
- 1 to 2 medium sized tomatoes (paste type are the easiest to work with but any kind will do)
- A few sprigs of fresh basil
- 1 garlic clove
- small block of mozzarella cheese
- 1 Cup Mayonnaise
Pre-heat oven to 425
Slice baguette in half inch slices and set aside. Slice zucchini in about quarter inch slices and set aside. Slice the tomato in thin slices and if they are large cut in half so they can fit on the bread slices without flopping over onto the pan.
In a small bowl place the 1 cup of mayonnaise and crush garlic into mayonnaise. Take basil and using scissors cut basil up in small pieces and add to mayonnaise mix. Using a fork stir mixture together until everything is mixed well.
Take mayonnaise mixture and spread a thin layer on each slice of bread and arrange bread on a cooking sheet, stone ware types work best as it keeps the bread from getting too soggy on the bottom. take zucchini slices and add one slice on top of each bread slice then place tomato slice on the top of the pile. Slice the mozzarella in thin slices and place on top of the veggies. Place pan of veggie melts in pre-heated oven and bake for 10 to 12 minutes or until the cheese has melted and started to brown. Remove from oven and let cool a few minutes before serving. Can be eaten while hot or when cool.
Heidi's Spicy Garden

This one is a Rohwer's Farm Original:
For the sauce:
3/4 cup olive oil
1/4 cup Frank's Hot Sauce (adjust this as needed to make milder or more spicy)
2-4 cloves garlic
2 tbs oregano
2 Tbs thyme
Produce for grilling - I use a mix of whatever I have in the garden that would be good on the grill like zucchini, eggplant, onions, potatoes, summer squash, shelled fava beans, tomatillas, and tomatoes.
I cut the produce into bite size pieces. Veggies that take a little more cooking, like potatoes, needs to be cut smaller so that it can cook better on the grill. Throw everything together except the tomatoes as these will cook too quickly and fall through the grill. Add the sauce and let the veggies marinate for at least 30 minutes, longer is even better. Remove the veggies from the marinade, reserving the remaining sauce. Place the veggies on a medium high grill in a grill basket or on a grilling plate and cook until veggies get soft and start to brown, stirring and drizzling the sauce over the veggies occasionally. Add the tomatoes for the last few minutes of grilling. You can also make this on the stove in a pan.
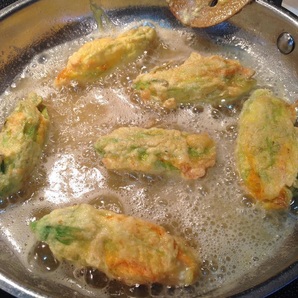
Squash Blossoms with Goat Cheese and Serrano Pepper
6 large squash blossoms
about 4 oz soft goat cheese (could use ricotta or another soft cheese)
1 serrano pepper, diced
1 green scallion, chopped
1 egg
1/4 - 1/2 cup flour (GF flour works fine as well, could use corn meal too!)
Directions:
Mix goat cheese, serrano, scallion in a separate bowl.Whisk egg in another bowl.Place flour in a third bowl.Gently open squash blossoms to make a “cup,” be careful not to tear the sides of the flower.Gently stuff blossoms with cheese mixture. Fill to the point where the sides of the flower can be pressed together to close over the cheese mixture. The flowers should be full to the point where they feel firm. A chopstick is helpful for pressing the cheese into the bottom of the “cup.”Dip each cheese stuffed flower into the whisked egg and then roll in flour.To fry, fill a frying pan with at least 1/4 deep vegetable oil and heat to the point where water droplets flicked on the surface of the oil will “sizzle.”Gently place breaded squash blossoms in hot oil and fry until lightly browned on all sides. (About 2:30 minutes on each side.)Let cool slightly and ENJOY!
Notes: These are great as a main dish, or as a side. The filling could be adapted in any number of ways to fit your tastes!
Cucumber Salad

The Gluten Free Goddess blog
has a delicious recipe for cucumbers:
The flavors mingle and intensify
overnight, so if you love a fresh "pickled" flavor make this recipe the night
before you wish to serve it; tossing it a couple of times as it chills to
distribute the dressing.
For the salad:
1 large
cucumber, peeled and cut into chunks
2-3 smaller cucumbers, peeled leaving
stripes of skin, sliced into coins
1/3 to 1/2 of a medium red onion, diced
fine, to taste
1 large ripe heirloom tomato- mine was yellow and ruby pink
gorgeous, seeded and diced
For the dressing:
1/4 cup champagne or white wine vinegar
1 tablespoon balsamic vinegar
1
tablespoon good tasting olive oil
2 teaspoons raw organic agave nectar, or
more to taste
A tiny pinch of sea salt, or to taste (you can always add
more- don't add too much)
Fresh ground pepper, to taste
Instructions:
In a large non-reactive bowl combine
the cut and sliced cucumbers with the diced onion and tomato.
Whisk your
dressing ingredients in a glass measuring cup until frothy and pour all over the
cuke salad. Gently toss to coat. Cover and chill at least an hour before
serving.
Serves 6

Fresh Raspberry Lemonade
Nothing taste better then homemade lemonade from freshly squeezed lemons, and the added raspberries just make this a great summer treat. We use lemon juice from Meyer lemons off our friends tree from Arizona that we freeze and use throughout the year.
Ingredients:
1 cup fresh lemon juice
1 cup sugar (more or less to taste)
1/2 cup raspberries
Put in the blender lemon juice, sugar and raspberries, making sure to put a few raspberries aside to make it look fancy if you want! Blend well and pour into a half gallon container, then finish filling until you get a full half gallon. Stir well and let sit for a little while to let the air work out of the lemonade. Add raspberries to the individual glasses as you serve.
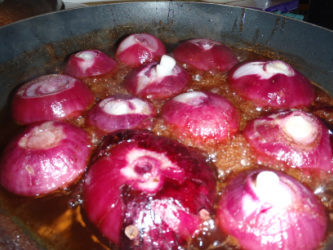
CIPOLLINE IN AGRODOLCE (SWEET AND SOUR ONIONS)
- ¼ cup unsalted butter
- 5 Tbsp sugar
- 2 Tbsp balsamic vinegar
- ½ cup white wine vinegar
- 1lb small onions, this recipe traditionally uses Cipolline onions but also works great with Red Candy Apple and smaller Torpedo and Super star onions
- salt and pepper
- Melt the butter in a heavy bottomed skillet over low heat. Add the sugar and heat, stirring constantly, until it has dissolved.
- Stir in the vinegars, then add the onions and season to taste with the salt and pepper.
- Increase the heat to medium, cover and cook for 25 minutes, or until the onions are tender and golden. Serve immediately.
Serves 4
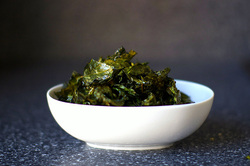
Kale Chips
Ingredients:
- 1 bunch kale
- 1 tablespoon olive oil
- 1 teaspoon seasoned salt
Directions :
- Preheat an oven to 350 degrees F (175 degrees C). Line a non insulated cookie sheet with parchment paper.
- With a knife or kitchen shears carefully remove the leaves from the thick stems and tear into bite size pieces. Wash and thoroughly dry kale with a salad spinner. Drizzle kale with olive oil and sprinkle with seasoning salt.
- Bake until the edges brown but are not burnt, 10 to 15 minutes.
Kale with Tomato, Garlic and Thyme
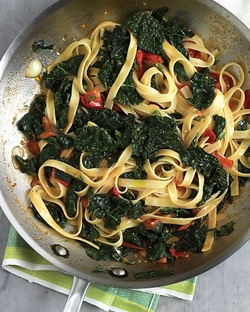
Martha Stewart had several great Kale recipes on her website. Here is one that can be served in many ways.
Enjoy this saute as a side, toss with pasta for a main course, or serve on crostini.
Serves 4
Ingredients
Enjoy this saute as a side, toss with pasta for a main course, or serve on crostini.
Serves 4
Ingredients
- 1 tablespoons plus two teaspoons extra-virgin olive oil
- 2 cloves garlic
- 2 cups cherry tomatoes
- 1 1/2 teaspoons fresh thyme leaves
- 1 pound boiled, chopped kale leaves
- Coarse salt and ground pepper
- In a large skillet, heat 1 tablespoon olive oil over medium. Add garlic cloves, thinly sliced, and cook, stirring, until fragrant, 30 seconds. Add cherry tomatoes, quartered, and fresh thyme leaves. Cook until tomatoes begin to break down, 2 minutes. Add kale and cook until heated through, 2 minutes. Season with salt and pepper. Drizzle with 2 teaspoons oil.
Mediterranean Summer Salad

Ingredients
1. Cook orzo according to package directions.
2. Meanwhile, in a large bowl, combine tomatoes, basil, garlic, pine nuts, olives, feta, and spinach. Add cooked orzo.
3. In a small bowl, whisk together oil, vinegar, and salt and pepper to taste; toss with salad.
- 8 ounces orzo pasta
- 2 cups halved cherry tomatoes
- 1 cup fresh basil leaves, chopped
- 1 teaspoon minced garlic
- 1/4 cup toasted pine nuts
- 1/2 cup Greek olives such as kalamata, pitted and halved
- 4 ounces feta cheese, broken into large chunks
- 2 cups baby spinach leaves
- 1 tablespoon extra-virgin olive oil
- 2 tablespoons balsamic vinegar
- Salt
- freshly ground black pepper
1. Cook orzo according to package directions.
2. Meanwhile, in a large bowl, combine tomatoes, basil, garlic, pine nuts, olives, feta, and spinach. Add cooked orzo.
3. In a small bowl, whisk together oil, vinegar, and salt and pepper to taste; toss with salad.